Monday, March 19, 2018

On Wonder...

I have been teaching kids how to read for years, and it never gets any less exciting to witness the moment when a child realizes that they have the reins to the world because they can make meaning of these shapes and symbols that make up our language. 

Recently during one of our commutes home from school, my 7-year-old daughter, Kansas, looked out of the car window and read a Denny’s sign aloud: 


ALWAYS OPEN. 

She pondered for a minute and then the questions started to pour out.

“Wait, Denny’s is always open!?! They never close? Do the waiters stay awake all night? Don’t they get tired?!?! Do they take naps!?!” 

This lead to a lengthy conversation about how some humans are nocturnal like bats and sleep during the day so they can work at night. I do believe a midnight pancake run may be happening some day soon because she was so blown away by this concept. 

This also led to further discussion and research about other jobs that might have you stay up all night, such as medical professionals and law enforcement/public safety workers. She drew pictures and made a book with facts about different jobs. Ultimately, Kansas decided that while those jobs are very important, she would like to have a job where she works in the day time.

She looked up, saw a sign, and made meaning. And then she started asking questions because she wanted to know more. 

I hope she never stops asking questions!

--

Young students come to us with an innate sense of wonder. They are naturally curious about the world around them and constantly seek to make meaning and find relevance. And oh, how they LOVE to ask questions! 

There's no doubt that teaching is a challenging profession. Teachers have amazing hearts and a true desire to make a lasting impact on their students. It can be so tough, though! Pacing calendars and boxed curriculum tend to drive our days and it’s easy to fall into the habit of telling kids to be quiet and follow directions so you can get through your lesson plan. 

Your plan.

Do you have a place in your schedule for students to explore their passions? Do they have opportunities to research their curiosities? 

I recently read the book Dive in to Inquiry by Trevor McKenzie. The author walks readers through the concept of inquiry-based learning. He includes a process to start with structured inquiry to help develop this way of thinking and learning in our students that gradually shifts and releases the inquiry into the hands of students in a free-inquiry model. While most of the examples in this particular book are for older students, it really got me thinking about passion projects with little learners. 


I wondered:

How can we empower young students to engage in inquiry-based learning and take learning into their own hands? 


Getting Started on Inquiry with Little Learners

Read a relevant children's book on problem solving or making a difference. Some current samples include: The Most Magnificent ThingWhat Do You Do with an Idea, or Rosie Revere, Engineer or one of the many others by Andrea Beaty.

Keep it Simple

Ask a questions such as "What do you wonder?" or "What problem do you want to solve?" Young children are full of questions. Their natural curiosities can easily be nourished! As teachers, we always want to help our students. We also need to develop an understanding of when to resist the urge to feed them answers and instead help them find questions to ask. So often, students develop a fear of not knowing the answers, and this could inhibit them from questioning bravely.

Once the students have their question, give them access to the tools to discover answers! 

1. Research
Take a trip to the library to find books. Also, explore developmentally appropriate online resources such as KiddlePebble GOWonderopolis, and the Tinybop apps.

2. Create! 
Time for creative play and free discovery is the most important opportunity during this learning process. Play-based learning helps young students make meaning through manipulating materials, engaging with peers, using all of their senses, and considering their feelings. 

Be sure to have students document their process as they go! 

3. Reflect
Young students don’t always have a natural inclination to do this. Guide them, scaffold them through the concept. Model think-alouds and provide reflective questions for them to ask themselves. 
“Did I discover my answer?”
“Did I solve my problem?”
“Did it work?”

And also have them explore their failures along the way! “What could I do differently next time? How can I make this better?”


4. Iterate:
Set the foundations for perseverance! Young students building with blocks will inevitably rebuild towers that topple. They don't see this as a failure, but rather, an opportunity to build again! Maybe this next one will be taller, or stand for longer. Young students at play embody the adage of, "If at first you don't succeed, try again!" We need to make sure this resilience transfers to academic contexts as well.

5. Share! 
Even our youngest scholars thrive when they have an audience to shine for. SeesawBunceeFlipgrid, and many tools in the Google Suite all have user-friendly interfaces that allow young students to quickly become independent. With modeling, scaffolding, and opportunities to practice, exploring their curiosities can lead them to become creators and publishers of content, teaching the world!

Our youngest learners can do so much when we put the tools in their hands and give them meaningful opportunities to inquire, investigate, create, and SHOW us what they know. As their teachers, we have the amazing gift to share this learning journey alongside their beautiful, growing minds.


Trevor MacKenzie has written a new book, this time partnered with a Kindergarten Teacher, Rebecca Bathurst-Hunt. This follow-up book titled, Inquiry Mindset: Nurturing the Dreams, Wonders, and Curiosities of Our Youngest Learners is available for on Amazon and will be released on March 21st, 2018. 

Twelve Google Drawings for the Primary Classroom


Let's CREATE!


Google Drawings gives students a creative way to SHOW what they know. It is a way for students to make their thinking visible! 

Google Drawings is often thought of as that OTHER Google tool, the forgotten one, and sometimes even the scary one! It's an amazing resource that many people just don't know much about. 

To demystify this under-utilized and under-loved tool, let me start by explaining this: Google Drawings is essentially ONE SLIDE. If you already know Google Slides basics such as the image, shape, and text tools, you already know how to use Google Drawings! 

One major difference between Slides and Drawings that users notice right away is that pesky checkerboard background you see when you open a Drawing! All this means is that the canvas you start with in Google Drawings is TRANSPARENT, or invisible. There might be times when having a transparent image is important to your task. For the most part, your activities with little learners won't require this. You can change the transparent background by right-clicking on the blank canvas, choosing background, and then selecting a color. 


Twelve Google Drawings for the Primary Classroom


Let's explore how to use this amazing tool with little leaners! I've collected 12 examples of Google Drawings activities designed especially for the primary classroom. Many examples have templates you can use in your Google Classroom tomorrow!

Put this fabulous tool in your little learners' hands and see what they CAN DO!

**A note for iPad users. Unfortunately, Google Drawings isn't compatible with iPads. There currently isn't a Google Drawings app. However, most of the activities below could easily be adapted into an activity using the Google Slides app.


1: Shape Attribute Posters:


Starting with a blank drawing, students use the shape tool to draw the triangle and type text into a callout to describe the shape's attributes. This activity could also be used with three dimensional shapes.


2: Diagrams


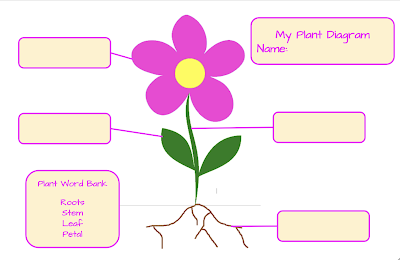
This entry-level activity is great to use with very young children. It's a way to set foundations in how to open a file from Google Classroom and enter text. Providing a word bank is a nice scaffold for early learners!


As students become more familiar with the tools, they can CREATE their own diagrams! In this assignment, students were asked to create a diagram of a vehicle of their choosing. They chose trains, planes, cars, and SKATEBOARDS! Students started with a blank Drawing and inserted an image of their chosen vehicle. Then they used shapes and lines to add the labels to their diagram.


Diagram Templates


3: Self-portraits:


Starting with a blank drawing, students use shapes and lines to create a digital likeness of themselves. This activity is a great way to introduce students to the shape and line features of Google Drawings. It's so fun to see how students perceive how they look and what characteristics they include.


4: Healthy Foods Poster: Template


This template can be distributed through Google Classroom. Students insert images within Google Drawings. You will need to model HOW to do this for your students. If you are working with very young students, it might be a good idea to brainstorm lists and charts of healthy foods to have available to help with spelling when searching for healthy items for their plate. Picture dictionaries are also useful.


5: Thinking Maps


Thinking Maps are used with little learners as a way to organize thoughts on a topic and build vocabulary before speaking or writing. Use these digital Thinking Maps whole class,  OR distribute a template through Google Classroom. Students insert images and/or words about the topic. 


Circle Map: Template


Tree Map: Template


If you are a Seesaw user, these Thinking Maps can be integrated from Google Drive into the Seesaw interface, where students can then record themselves speaking on their topic using their Thinking Map.


6: Math Modeling: Template


Skip the worksheet! Students use this template and model showing amounts of money using dimes and pennies. Students drag coins from the piles on the side on to their canvas.


7: More Math Models: Place Value and Beyond! Template


Move over fill-in-the-bubble tests! This template could be used as a formative assessment. Give students a three digit number or have them randomly choose a three digit number from a pile, or even have them create one by rolling dice! 


8: Graphic Organizers: Template


Students can organize their research with graphic organizers! Using Google Drawings for this task allows them to easily add text, images, and even links to resources. 


9: Reporting Learning


Second Grade students researched different types of extreme weather. They shared their learning by making a poster using Google Drawings. Starting with a blank Drawing, they were tasked to enter at least five facts and five images about their topic.


After researching an American President, students share five facts and images about what they learned!

Template


10: Take it to the next level: Mock Magazine Covers! Template


Have students research an important person. Distribute this template in Google Classroom. They can insert an image of an that person and write important facts they have learned. You will need to show them how to RESIZE their inserted image and SEND IT TO THE BACK of the other layers of the drawing. (right-click to get options, select ORDER, and then SEND TO BACK) A fun twist on this activity has students make a Time Magazine cover about themselves! Thanks to Ryan O'Donnell (@creativeedtech) for the inspiration for this. Find more ideas in his template gallery.


11: Posters! 


PBIS Pledge: Template

Young Learners practice their PBIS STAR POWER PLEDGE by filling in the text of the pledge that was distributed through Google Classroom.


Digital Citizenship All-Stars: Template

After a lesson on Internet Safety for Digital Citizenship Week, first grade students created these posters with quotes about how they can be super digital citizens. The template was distributed in Google Classroom.


12: Multimedia Text Sets


My very talented friend and Kindergarten teacher @KubarsKinders created these Google Drawings Multimedia Text Sets to share with her students in Google Classroom. Each book cover leads students to a YouTube Read Aloud of the text that has been masked with the website ViewPure.com to make the YouTube Videos more friendly for little learners. Learn more about View Pure and YouTube on my post titled Ten Smart and Safe YouTube Practices for the Primary Classroom.

Ocean Life

Farm Stories

Tips for little learners:


  • Model, Model, Model! Walk through the steps and expectations as a whole class - have them WATCH YOU do it at least once or twice! 
  • Keep it Simple! If you are just getting started, your students need opportunities to practice simple tasks like opening and closing activities and moving their cursor around the screen to enter text. Early activities can be as simple as typing a name into a box.
  • Teach young scholars how to fix their own their mistakes! Show them the UNDO button and teach them to use the keyboard shortcut Control/Command+Z to UNDO their OOPSies.


Give Students an Audience: Share what they create! 


Set foundations for global learning by providing your young students with opportunities to share to an authentic audience. Google Drawings can be downloaded as image files or directly added to sharing tools such as Seesaw! Students can then record audio descriptions of their learning to share with their peers and parents.


Additional Google Drawings Resources: 

#K2CanToo Holiday Creative Fun Collection

Looking for some fun holiday activity options for your little learners in these last days before vacation? Check out this Holiday Fun Collection designed with young students in mind! 


Included:

  • Holiday Graphing and Patterns
  • Holiday Information Videos
  • Holiday Stories Read Aloud
  • BreakoutEDU Digital
  • Holiday Pixel Art (TWO OPTIONS!)
  • Links to Holiday ABCYa! Games
  • Build a Snowman by Eric Curts

To share this with your little learners:

1: Click here to make your own editable copy of the Google Slides file.

2: Edit the file to best meet the needs of your students. If there are pages that aren't right for your kiddos, simply delete those slide!

3: Assign YOUR COPY to your students in Google Classroom! Make sure to select MAKE A COPY for every student when you create the assignment.

#K2CanToo - Holiday Breakout EDU for Little Learners!


In my previous post, Little Learners Love BreakoutEDU, I shared a number of examples of BreakoutEDU being enjoyed by primary-aged students.

Breakout is a wonderful way for even very young students to engage all of the 4Cs of modern learning: Communication, Collaboration, Critical Thinking, and Creativity! If you haven't heard about this amazing game-based learning platform, please check out their website at BreakoutEDU.com.

Digital Tools

Whenever possible, I try to include clues or activities that require students to utilize the available classroom technology during the Breakout. Whether it's a fact to research, a video to watch, or some other digital activity, it's awesome when students recognize that technology can be used as a tool to find information or solve a problem.

Because I work in a district that is 1:1 with Chromebooks, Google Classroom is a great option that serves as a place to hide links to additional clues or activities. For iPad users, QR codes are another great way to do this! 

Santa's Workshop

Check out this example of a Christmas-themed Breakout EDU game for second graders. There are a number of clues that ask students to use their Chromebooks, including a story to watch, a puzzle to complete, and a Google Drawings sequencing activity!

Scenario: Elves have lost the key to Santa's Workshop!

4 Digit Lock: 7687 When students combine the number of gifts made by each elf team, the answers are 7 RED. 6 GREEN, 8 BLUE and then repeat 7 AGAIN. 

Key Lock: This task gives away the location of a hidden key. Under the statement. "All I want for Christmas", I wrote the title of a book students could find in the classroom using invisible ink. This could also be a toy or stuffed animal where the key is hidden! Students will find a UV flashlight to read the invisible ink in another task!

Five Letter Lock: This is a Jigsaw Planet puzzle that is linked in the students' Google Classroom. I usually leave a Google Classroom icon on the table as a hint that the students should check Google Classroom for hints and clues! When the students arrange the puzzle pieces, it reveals the question, "Who are we?" Students must know that the plural spelling of ELF is ELVES, which is the answer to their 5 letter lock.

Directional Lock: This task was inspired by Parri Harju's Reindeer Games. Holiday trees arranged in different directions act as the combination to the directional lock. This can be adapted to be more or less complex by separating the tress and mixing up the order, asking students to realize that the tree with only one ornament goes first.

Four Letter Lock: Patti Harju also created this ABC Rebus chart in her awesome game, Reindeer Games. I created a new Rebus puzzle that when decoded says, "antonym of naughty." This would give them the answer NICE for a 4 letter lock.  The ABC chart is usually hidden away from the rest of the puzzle, so students have to realize the two pieces go together,  and then solve the puzzle.


5 Digit Lock: This is another activity that asked students to utilize their technology! First, they had to watch an online version of The Gingerbread Man. I used the resource Viewpure.com to give a child-friendly version of the YouTube video. Then, students opened this Google Drawing file that asked them to put the elements of the story into the correct order. A hint tells the students that the elves only use odd numbers, so they then discover that the secret code is the 5 digit number, 93117. This clue can be adapted for iPads (which don't have Google Drawings), can be adapted to a non-digital option, and also can be adapted to be a 4 digit answer instead.  See the SANTA'S WORKSHOP FILE for instructions on these potential adaptations.

3 Digit Lock: These Christmas ornaments can be printed and cut apart and set on a table, or perhaps get hung on a classroom Christmas tree! Students use place value to determine the 3-digit number that opens a small locking box that holds the Rebus ABC chart and the UV flashlight!

Inside the large box, hide this sheet. 

Want to play Santa's Workshop with your little learners? The full file can be found here:

bit.ly/SantasWorkshopBreakout

Print the file as is, or make your own editable copy of this by selecting FILE and then MAKE A COPY.

#K2CanToo! Tips for Little Learners:

Model, model, model.
If it’s your first time playing Breakout EDU with little ones, take a few minutes to show them some basics of how the locks work. I’ve seen many students spell out the correct letters or combination on a lock, but didn’t realize there was a specific place/mark on the lock where the dials should be lined up. The directional lock can be a challenge for learners of all ages! It’s a good idea to show the kiddos the mechanics of how to make the lock work! You may want to utilize these Breakout EDU Lock Practice Cards to let students become with familiar with the lock mechanics before playing an actual Breakout EDU scenario:

Small groups work well!
I prefer to have the students work in small groups, and usually bring three boxes to the primary classrooms. If you don’t have access to multiple boxes, consider using a lock combo recording sheet with each team. Many of the games on the Breakout EDU website include some variation of this recording sheet for playing with teams:


You could also run the game like you would centers. Have a different puzzle/clue/task lock at each station. Either have each group work on a separate lock, or have groups rotate through the clues and reset the lock or puzzle when the groups move to the next table. 
Get help, especially the first time!
It might be a good idea to plan your Breakout at a time when you have an aide or parent helper in the room. Consider inviting instructional coaches or administrators in for the fun, too!  
Everyone plays! 
To maximize engagement and keep kiddos on-task, include some activities that EVERY student needs to accomplish (a great example of this would be an instructional video on how to draw the Cat in the Hat, and when ALL members of the team share the drawing to the Breakout Facilitator, the team gets a key, hint, or clue!)

Here are some additional Breakout games I've designed for young students. Please feel free to copy and modify as needed for your own students!

Autumn Fun
Pete the Cat
The Snowman

More Resources:

Original Blog: Little Learners Love Breakout EDU
Breakout EDU Getting Started
Breakout EDU Blog


Keeping It Simple! Google Docs + Google Classroom in Kindergarten


It's so simple - but exactly what they need to get started. I was so thrilled today when one of my Kindergarten teachers shared this basic Google Doc her students had worked on through Google Classroom.


Students identify the letter L amongst the sea of other symbols that they are just beginning to recognize, they move their cursor either with the touchpad or by using the arrows keys, and use the backspace key to delete the letter L. In completing this basic activity, the students have practiced a number of foundational skills on the keyboard that will set them up for success in writing and sharing their digital creations.

Sure, they don't walk in KNOWING how to do these things. It takes modeling and practice!  Little learners who haven't had much experience with computers struggle with the most basic skills - logging in, clicking, selecting, dragging and dropping, finding the letters, making sure not to push the keys too many times.  

For these reasons, the activities we plan for Kindergarteners should be simple, especially in the beginning. Click, point, find. Open the assignment, close the tab. Yes, it can be challenging to get started, but once the Google Suite door is opened for our little learners, an ocean of creativity is at their fingertips!  

Start with the basics. Find the box. Type the words. Practice something simple every day! Celebrate the successes!


What can our littlest learners create when we put modern tools in their hands? The possibilities are endless! We need to empower them with access and provide opportunities to practice so they can build foundational fluencies. We need to believe in what our littlest learners CAN do!

Templates:
Letter L Practice - Credit to S. Haller


Ten Smart and Safe YouTube Practices for the Primary Classroom

YouTube is an undeniable force in education. It has become among the top search engines! When people need information, they often turn to YouTube. Teachers also LOVE YouTube! There tens of thousands of videos of instructional content, songs, and fun. Whether it’s a song about short vowels or a lesson in fact and opinion, YouTube has resources to teach and reinforce many educational topics for all grade levels and subject areas.

As with many internet resources, YouTube has a dark side of potentially inappropriate content. This sometimes prevents our primary teachers, the teachers of our littlest learners, from using YouTube in order to protect their students from the questionable content and advertising. And while internet filters have a place in school, they aren’t the only answer. We have to teach even our littlest learners how to safely navigate through any danger they might encounter.

Below I have collected ten safe and smart practices for using YouTube in the primary classroom. Please enjoy these tips and tricks to help make YouTube safer, more accessible, and appropriate for our littlest learners.

1. Make sure your kiddos are connected/signed in through their Google accounts.
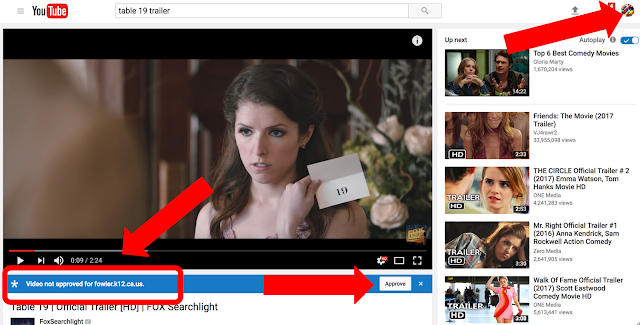
Youtube and the Google Suite work together to help make sure that the content available to students is appropriate and educational. Your Google Suite administrator can use the managed YouTube features to limit and customize access to non-educational or inappropriate content.


Video has been approved in the domain.
Video has not been approved in the domain. Your domain settings may allow you to approve videos that are appropriate for education. Some domains may required you to contact someone with access to your Google Admin Panel.

2. Have a system/procedure for distributing video links!


Use Google Classroom, QR codes, or your Learning Management System to distribute video links. This will get young students directly to the content you want them to see. Provide a clear path, and your little learners won’t get lost along the way!

3. Keep it short!
Primary students have tiny attention spans. Use the YouTube search filters to identify videos that are under 4 minutes. Skip past extra content by sharing a link to a specific starting time in the video. Tools such as Tubechop will also allow you to create links that play only certain parts of your YouTube video.


4.  A Clear View.
Add an additional layer of focus and protection by using tools such as viewpure.com or safeshare.TV. These resources embed the YouTube content into a cleaner screen, without the Up Next, Suggested, and video comments. These resources also allow you to create links to custom starting and ending times.
Before ViewPure, video screen shows comments and suggested videos.
ViewPure purifies the screen view, removing the things that can distract little learners!


5. Embed, embed, embed!
Embedding videos into Slides, Forms, and Sites is another way to hide some of the YouTube distractions. This allows students to view the content directly in the Google application instead of a new tab.


6. AdBlock for YouTube
Use the free extension AdBlock for YouTube to help minimize YouTube ads! This tool gets rid of all pre-roll advertisements on YouTube videos.


7. Preview EVERYTHING.
It’s important that you watch every video from start to finish BEFORE sharing it with students. Use the play speed controls in YouTube to save time during preview. Playing videos at 1.5 or 2X speed lets you check the videos quickly!

Check out this YouTube tutorial by Josh Harris @ EdTechSpec about previewing videos quickly.


8. Create playlists!
One way to organize your YouTube experience is to create Playlists of your favorite content. Playlists allow viewers to program what they watch next on the channel. Playlists will allow you to play a continuous set of videos in your chosen order. For example, you can make a playlist of related content such as short vowel videos or videos about the letter B. Create a 15-minute rainy-day playlist of your students’ favorite Just Dance videos for those days you have indoor recess and want to give your kiddos a chance to get their wiggles out!

9. Subscribe to your favorite educational channels!
There are educators from around the world creating powerful content. Subscribe to your favorite creators and channels to receive notifications when they add new content!


10. YOU be the YouTube star!
If you can't find just the right video to meet your young scholars’ needs, create it yourself! You can record videos using basic tools such as your device’s native camera or Screencastify in the Chrome browser. Video editing tools such as iMovie, Camtasia, or WeVideo let you add functional and creative finishing touches to your videos. Upload them to YouTube or Google Drive for sharing!


For more information, visit Youtube.com/teachers. This website offers tips and tricks for leveraging video in the classroom.

Find a full presentation of resources here: Bit.ly/K2YouTube